Life Gets in the Way
Posted On Thursday, April 17, 2008 at at 9:23 AM by KoshUnfortunately, I have to get out of the Miniatures Wargaming hobby. Well, I'll just leave it at that.
Budget: Current Projects
Posted On Wednesday, April 2, 2008 at at 4:45 PM by KoshScenic Magnetic Base
This weeks budget is going to be used to buy materials for a scenic magnetic display base. There will also be plenty of material left over for terrain making in the future. Most of the materials needed are self explanatory and can be bought at your local DIY store (Home Depot or Lowe's.)
The first thing we need is pink or blue insulation foam. Not just any foam, but extruded polystyrene. This foam is very dense and not like the foam you find at hobby stores used for floral arrangements. The blue type is made by DOW and the pink is made by Owens Corning. This stuff can be difficult to find depending on where you live, I've heard it's almost impossible to find in California. Luckily, in my neck of the woods, Lowe's sells the blue stuff and Home Depot sells the pink. It's sold in 4'x8' sheets, similar to plywood and can be found in the building materials section near the plywood in both stores. I bought two sheets, one 2" thick and one 1/2" thick for $40.
Next we'll need something to cut the foam. Actually, two items will be needed, a keyhole saw and a hot-wire cutter. The hot-wire cutter cuts through the foam like a hot knife through butter and leaves a nice smooth cut. However, due to it's shape it's hard to cut a large piece of foam off the sheet with it. To cut a chunk off the sheet, use the keyhole saw, cut it about 1/8" bigger than you want off the sheet. Then, using the hot-wire cutter, cut off the 1/8" for a nice smooth cut. The hot-wire cutter can be purchased at a big chain hobby store. I got both the saw and cutter for $15.
The rest of materials are as follows:
Wood Filler - $5
Wood Glue - $3
Foam Board - $6
1" and 1 1/2" Zinc plated washers - $6
1/4" Dia x 3/32" Thick NdFeB Disc Magnets (Model #D094B at Amazing Magnets) - $12
Flat Black Spray Paint - $4
Hot Glue Gun and Glue Sticks - $8
Styrene Sheets (Plasticard) - $7
This will leave plenty of materials to build a lot of terrain as well as a scenic base.
Project 1 - Magnetic Display Base
This project came out of No Quarter Magazine #5. Your best bet is to get a copy of NQ #5 if you can, but here are the very basic steps.
Cut out a block of 2" foam big enough for your army.
Cut out smaller pieces of foam to create tiers.
Cut out foam board to match your base and tiers.
Cut out circles for where your model bases will go.
Glue all the pieces together.
Glue zinc plated washers inside of circles. (Don't forget to glue the magnets to your models base.)
Fill in all cracks with wood filler.
Place any rocks or other scenic items.
Splotch on a mix of wood filler and water, should be like mud.
Glue sand to each tier level.
Cut and glue plasticard around the outside of the bottom base.
Spray paint flat black. (I'm at this point so far)
Paint the base how you want and add static grass or any other scenery you like.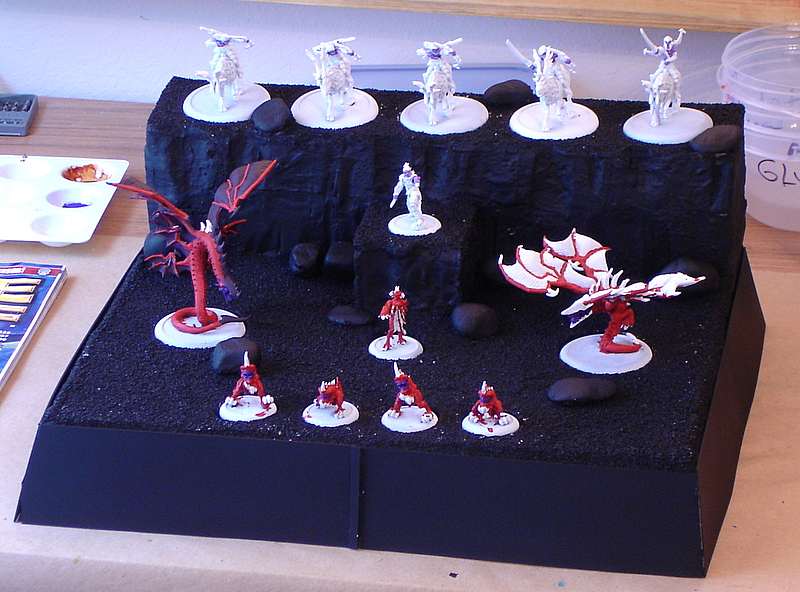
Project #2 - Painting Legion of Everblight Hordes Army
As you can see above I'm still working on it. I decided to go with a different color scheme than normal for Everblight. I'm going with red/orange looking dragons and a dark color (mechrite red/chaos black/liche purple 1:1:1 mix) for the spines and elf armor. It is similar to the bottom dragon pictured over here.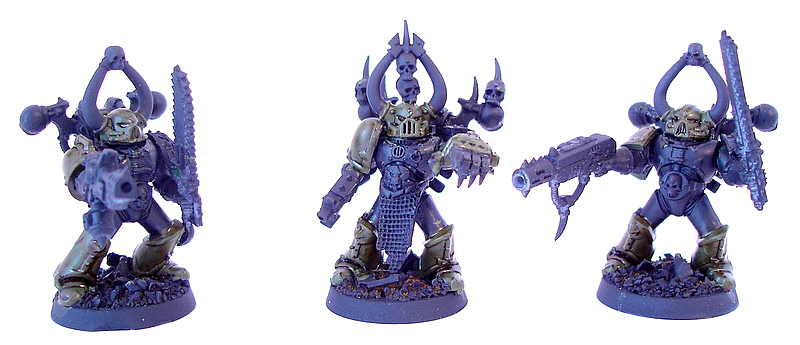
Project #3 - Chaos Space Marines
Last but not least, I haven't forgotten about 40k. I'm still working on my CSM squad. I'm painting them in a Purge color scheme. I still need to highlight the green armor, then hit all the metallic bits. I'm still trying to figure out how I want to highlight the black armor. It will probably be gray with a slight touch of green.
That's it for now. The total budget this week was $106, looks like we went over a bit. But, at least we have all the basics to build some terrain, as well as plenty of material left over. There's still a lot of work to be done...
Budget: A Few Last Things
Posted On Wednesday, March 19, 2008 at at 3:14 PM by Kosh
Clear Coat Finish, Modeling Putty and Sculpting Tool
At this point there's only a few more things needed to complete the basics of painting and modeling supplies. Really, a couple of these things may not be necessary at this point. The modeling putty and sculpting tool may not be needed until you get some metal models.
Clear Coat Finish
You will really want to put a clear coat on your models if you plan on playing games with them. A clear coat will protect your models and the paint job. Testor's Dullcote and Citadel Matte Varnish are a couple sprays you can use as a clear coat to finish off your models. These two products I mentioned are matte, meaning they won't leave a shiny appearance. If you want a particular part of your model to have a shiny appearance I'd recommend picking up a bottle of gloss varnish and use a brush to apply it to the particular part after you have sprayed it with the matte varnish. Most of the paint producers, Citadel, Vallejo, etc. make a gloss brush on varnish.
I don't have a lot of experience with the two sprays above, but after doing a little reading on these items it seems the Citadel brand Matte Varnish spray isn't that good. I picked up a bottle of Testor's Dullcote for $4. This particular product is no longer available in Europe due to the EU banning a certain chemical that is used in it's production. I've also heard that Krylon makes a good spray varnish and is probably the cheapest. You can find it at most home improvement stores, but I think it's only available in North America.
Modeling Putty and Sculpting Tool
Modeling putty, also called "green stuff," comes as two separate strips of putty, a blue strip and a yellow strip. Once the two are combined the magic begins to work, it turns green and begins to harden. It takes about two hours to completely harden, which means you have two hours to do with it what you want. It's mostly used to fill in gaps on metal models, but you can sculpt a complete model out of the stuff. It's packaged and sold by GW for $8 for a small amount. You can also get about four times the amount GW sells from Gale Force Nine for $18. I bought a package of GF9 putty.
A sculpting tool is used to spread and manipulate the modeling putty. This keeps from leaving fingerprints and helps smooth the putty out. GW sells a tool for $6, GF9 sells a 3 piece tool set for $12, and if you're really into sculpting you can get this nice 12 piece set pretty cheap. I picked up the Citadel tool, because that's all I could find in my area. You can check out this article for tips and tricks using green stuff and a sculpting tool.
Odds and Ends
You may also want to pick up a few more things for your work space such as shelving. I had a local carpenter put together a simple shelf out of some scrap wood he had lying around. It was only $6, but something you could easily do if you have the tools yourself.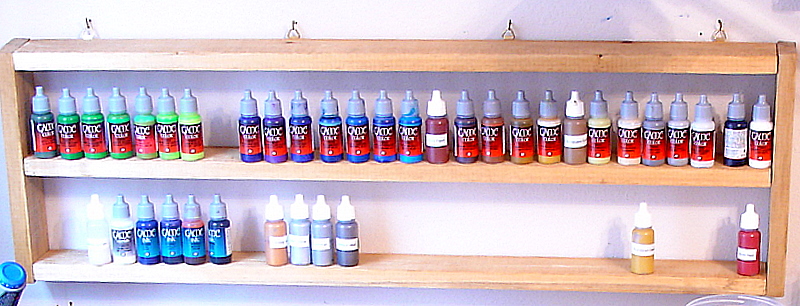
I also bought a couple of flatware trays at a flea market for $5. I had originally intended to store my paint on them, but that was before I decided to go with Vallejo paints, which didn't fit. However, I will use it to put my infantry size models on it for display. I picked up a cheap cork board as well for $10. I put a color wheel, mixing charts, and a Citadel to Vallejo equivalency chart on mine. You could also use it for inspiration by putting pictures from magazines or the internet on there.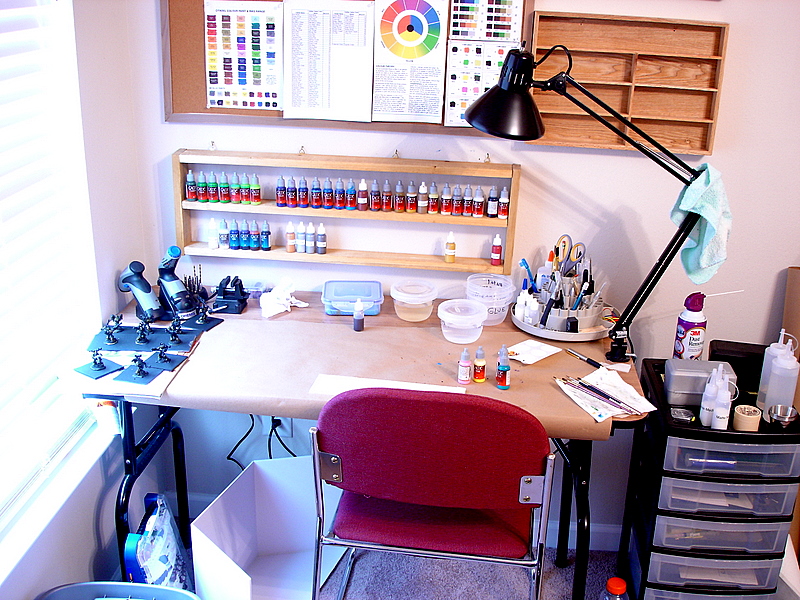
That does it for this budget, it came to $49. That pretty much does it for buying painting and modeling supplies, from here on out you will just need to replenish what you have or maybe pick up a few new colors of paint. There will still be more budgets coming, we still have models to buy as well as gaming accessories.
A Note
As you can see, I changed the name of my blog from Warhammer 40k on a Budget to Wargaming on a Budget. The reason is, I'm branching out. It's going to take me a while to buy all the models to make my 40k army, but I'm itching to play something. I've been checking out another game recently, Warmachine/Hordes by Privateer Press. From what I've seen it's a fun game and pretty cheap to get into. Most games are 500 point games, you can get a battle box of 350 points for only $50 and then build to 500 points for less than $100 total.
I had some credit at a game store I used to frequent and used that to buy a Legion of Everblight Hordes army. The local store is starting up a WM/Hordes league next Tuesday that I hope to get in on. I will try to get some pics up of those models as well as my Chaos Space Marine squad that's about half way done. Until then...
Budget: Paints and Brushes
Posted On Wednesday, March 5, 2008 at at 3:42 PM by KoshThere are a lot of different brands of paints and types of brushes out there. It can get confusing trying decide what to buy. I'll show you where I went to research paints and brushes and what I decided on getting for myself.
Brushes
There are bunch of different brushes out there. You don't necessarily need to worry about brand as much as you need to worry about what the bristles are made from. There's synthetic, camel hair, synthetic blend, squirrel, red sable, Kolinsky sable... it can be daunting. Here's a very good article that explains all the differences. The first thing you should do is not worry about any synthetic bristles. Some type of natural hair is usually better, with Kolinsky sable being the best. Kolinsky sable brushes are expensive though, about $10-$20 a brush. It's not that bad when compared to $8 for the GW brushes. Here's a few reasons why a Kolinsky sable brush is the best, this was taken from an article on the B&C written by Starks333.
-natural hairs keep their tips
-natural hair means they can hold moisture and oils better than synthetics which improves flow of paint
-natural kolinsky hairs are softer and less coarse, which means the paint comes off the brush smoother, less likely to streak
-good "snap" means the brush is less likely to fish hook from repeated strokes, or bend out of shape, it also means your strokes are smoother, less rigid(it slides along the piece instead of jumping around)
Yes, I was a skeptic at first, too. I went down to the local art store and took a look at them. They had two brands of Kolinsky sable brushes, Winsor & Newton and Raphaël. The W&N brushes were pretty splayed, so I took a look at the Raphaël brushes, specifically the 8408 Extra Pointed series. Let me tell you, I was surprised. Even I could tell that these were some nice brushes, they had a very nice point and they snapped right back into place after running the brush over the back of my hand. I was sold, the good news was they were 40% off. I bought a size 0 and a 1 for $22. You can also order these from www.dickblick.com. Sizes 0 and 1 should be good enough for now.
From the research I've done, if you take good care of these brushes they should last and hold their points at least a good 4-6 months. In the long run, they may be cheaper than buying $3-$5 cheap brushes every few weeks. I also picked up some brush soap for $5. Here's a good article on taking care of your brushes.
Paints
Citadel, Coat D'Arms, Vallejo, Privateer Press P3, and Reaper are some of the more popular brands of acrylic paints used for models. There are enamel paints out there for models as well, but a majority of people use acrylic paint. Acrylics can be thinned with water and you don't need a special type of thinner like you do with enamel. This site here has some reviews on some of the different brands I mentioned above.
My only experience is with the Citadel range of paints. These come in small pots with a pop top lid. I used them when they had a screw on lid several years ago. The Citadel paints I had dried out very quickly and this seems to be the main complaint about them still today. This was the main reason why I decided not to go with these paints... well, not completely. They do have some of the best metallic paints out there when compared to the others. So, for metallics this is what I decided to go with.
After doing some research, I decided to go with Vallejo Game Color paints for my colored paint. Their range matches Citadel only with different names, you can find a conversion chart here. The main reason I decided on Vallejo was the dropper bottles they come in, these bottles will let you measure your paint by drops when mixing. This makes it easier to keep color formulas when you mix your paints. The other thing I was hearing, was that they don't dry out nearly as fast as the Citadel range. Some folks even said they could last a couple of years in the bottle.
Before you actually buy the paint, you need to figure out what colors you'll be needing. I would suggest you get some neutral colors like black, white, gray, and brown. Maybe a couple shades of the gray and brown. As for main colors, I'd get 2-3 shades of those for highlighting, blending, and shading. I ended up getting 20 bottles of Vallejo for $59 and 5 bottles of Citadel metallics for $18.
One Last Thing
Since I went with the Vallejo dropper bottles, that means I'm going to need a palette since I can't just dip the brush into the paint pot. You can get a cheap small plastic palette for $1 at a hobby store. However, there is something better that will only cost you a few bucks more to make, a Wet Palette. Wet palettes are easy to make and they will make your paint last longer while on the palette, even up to weeks with the lid on. Here is a very good tutorial on making a wet palette. I found all the materials to make one at Wal-mart for $5. By the way, you definitely want to use Parchment paper and not wax paper for your wet palette.
In all, this weeks total was $109. I went over the $100 budget, but remember I brought over $20 from the last budget. It's a good thing I did, I kind of figured this week would be close. See you soon with information on primers and some pics of a few models I primed.
Fun With Magnets
Posted On Saturday, March 1, 2008 at at 6:08 PM by Kosh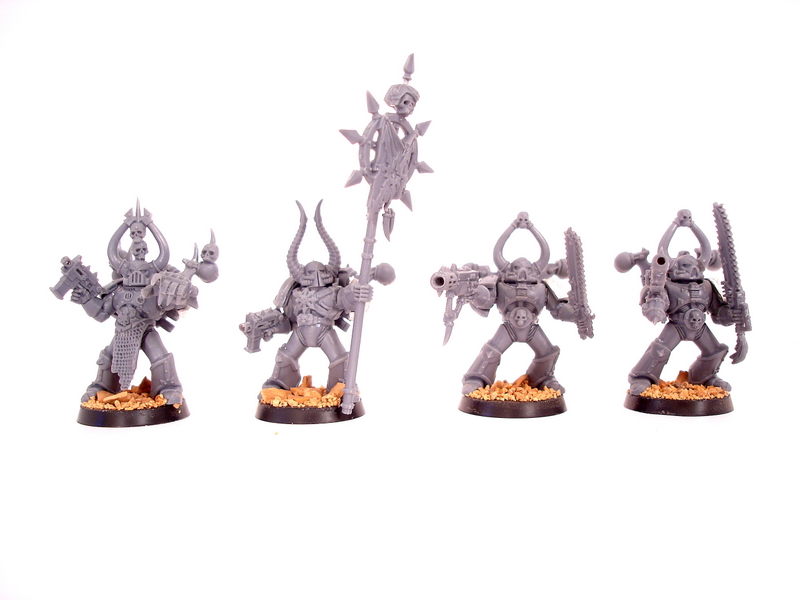
Why Magnetize?
In the long run magnetizing your models could save you money and a lot of trouble. For instance, with a 10 man Chaos Marine Squad you can change the options on four of your marines. You can have an Icon Bearer, an Aspiring Champion, and up to two marines can have different weapons. My squad currently has an Aspiring Champion with a power fist, an Icon Bearer with the Icon of Chaos Glory, a marine with a Flamer, and a marine with a Meltagun. Let's say after playtesting with this squad I want to change the Icon to a Slaanesh Icon and change the champion's power fist to a power weapon. If I had glued them on this would be difficult, yes possible, but with magnets very simple.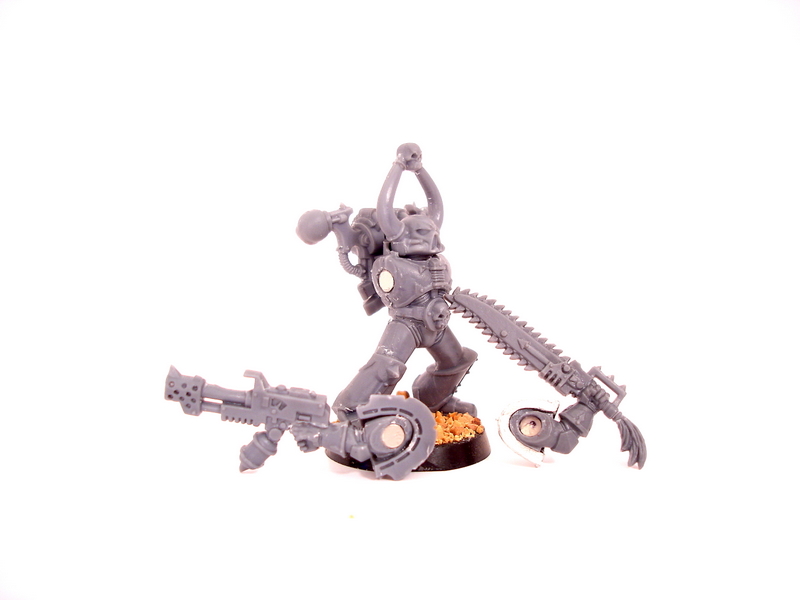
How to Magnetize?
First of all, check out this tutorial by Hyun over at Wee Toy Soldiers. Hyun is the man, I've learned so much from his blog in such a short time. This does take some special equipment such as a dremel. The type Hyun uses, a MiniMite are very inexpensive. I use a Dremel Stylus myself that I bought a while back, they run about $60. Of course, you'll also need magnets. I bought my magnets from Amazing Magnets. You can get 100 1/16" and 100 1/8" for $12.50 + shipping, that's a lot of magnets that should last a while.
A few things to remember. Mark the poles on your magnets. You don't want to try and put the wrong poles together after you've already super glued the magnets. I used a permanent marker to mark two magnets that were stuck together. This tells you that the marked side goes down into the hole you drilled. Another thing, don't magnetize every available optional weapon right away. Just do whatever you need for your army right now. If you decide to go back and change something, say a Flamer to a Plasma Gun, magnetize the plasma gun then. This way, you know which model you're going to put it on and you can put a magnet on the existing shoulder socket magnet to get your poles correct. One last thing, don't worry if you drill in too far (just don't drill all the way through) and your magnet isn't flush. You can stick some green stuff down in there or just go with it if it's not too bad, the magnet should still be strong enough to hold. It takes a few tries to get the depth correct.
That's about it. Don't get discouraged, a couple of people told me not to worry about magnetizing because I'm new to the hobby and may not be ready for it yet. You can read about doing things and watch tutorials until your blue in the face, but you're not going to really learn anything until you try to do it yourself. Remember, "What we have to learn to do, we learn by doing." - Aristotle.
WIP: Chaos Marines, Assemble!
Posted On Tuesday, February 26, 2008 at at 2:28 PM by KoshI've finally gotten started on some modeling. I started assembling the box of Chaos Space Marines I purchased last week. I've decided to only put six together so far, as I have plans to magnetize the other four. Hopefully, I will get started on that magnetization project later this week.
Putting together Space Marines is really pretty simple. There's basically eight steps to doing it and Games Workshop has an instruction page on it that you can find here. The eight steps are:
Step 1: Glue the legs to the base.
Step 2: Glue the torso halves together.
Step 3: Glue the torso to the legs.
Step 4: Glue the weapons to the arms.
Step 5: Glues the arms to the torso.
Step 6: Glue the head to the torso.
Step 7: Glue the shoulder pads to the arms.
Step 8: Glue the backpack to the torso.
That's all there is to it. I made a tutorial video of me putting mine together. It's not much, I just wanted to get my feet wet with Windows Movie Maker more than anything.
There are a few things to remember. Try to clean up any flash or mold lines before gluing the pieces together. It's okay if you miss a few, it's just easier to do before the model is completely put together. You can see that I missed a few on the arms and weapons.


That's it for this week. I'll see you next week with a new budget article. Hopefully sooner if my magnetization project comes together.
Budget: Flock, Primer, and Chaos
Posted On Tuesday, February 19, 2008 at at 3:06 PM by KoshIt's budget time again. This pay period I'll be buying the last few items needed to get our models primed and ready for painting. Also, I'll share with you the first set of models I bought. On a side note, if you're looking for a very, very good tutorial on taking pictures of your models check out this article written by Hyun over at Wee Toy Soldiers. Let's get started.
Modeling Sand or Flock
Modeling sand or flock is used for basing your models. It's glued on to the base using PVA glue and can be painted with the rest of the model. Some people like to base their models before they prime them, while others like to base their models as the last thing they do. I think I'd prefer to base them before priming and paint the base material as I paint the model.
GW sells this stuff for $8 a tub. I bought sand made by Gale Force Nine. They have three types fine, medium, and rocky. I picked up a container of each and mixed them all together, it was $13 for all three containers. There are plenty of cheaper ways to get basing material. If you want sand you could go out and collect it on the side of the road or the beach if you live near one. As for flock, you can make that out of sawdust and paint. Here's a written tutorial and a video on how to make flock, both are from Miniwargaming.com.
PVA Glue
PVA Glue is used to make your sand or flock stick to your base. PVA glue is nothing but ordinary white or yellow glue. Elmer's Glue, Wal-Mart brand, wood glue, it's all the same. Whatever you do, don't pay $7 for the GW PVA glue. I picked up a big bottle of Elmer's Glue All for $2. You're also going to need a cheap paint brush, I'd say a size 3 or 4, to apply the glue to your base. I got a cheap brush for $2 at a hobby store.
Spray Primer
Primer provides a base coat so that your paint adheres to your model. Without a primer your paint will rub off the plastic when it's handled. GW sells both white and black primer for $10 per can. From what I've read, beginners should use black primer to start out with, while most advanced painters tend to use white primer. If you'd like to know the reasons why, since I have no experience with either, check out this article by Starks. I bought the GW brand Choas Black for $11. Honestly I wanted a gray primer but, was unable to find one. If you know of a good brand of gray primer let me know.
Buying Models
I haven't completely decided on an army list yet. However, every list I seem to come up with usually has 10 Chaos Space Marines in it, therefore I bought the Chaos Space Marine box set for $39. Yes, sales tax in my state is ridiculous, it's 9.75%. Anyway, I'm pretty excited about getting started on them and hope to do so sometime this week. Check out the sprue.


Budget
The total amount spent this time was $67. I'm going to save $20 from this budget and bring it forward to the next budget. I'm anticipating that I'll need it to buy paint, brushes, and possibly some shelves to store the paint. But hey, I'll be back before then. The next couple of articles will be works in progress on modeling the Chaos Space Marines. See you then.
WIP: My First Army List
Posted On Wednesday, February 13, 2008 at at 12:38 PM by KoshThe List
After making my way through the CSM Codex, I wanted to start working on an army list. My goal is to get something together so I'll at least have an idea of what models I should pick up on the next budget. I wanted to select units that I thought were interesting, in both game mechanic and model aesthetics. Here's the first list I came up with.
Army #1
HQ
Chaos Sorcerer - 145
-Mark of Slaanesh, Lash of Submission, Jump Pack
Troops
9 x Thousand Sons - 274
-Aspiring Sorcerer, Bolt of Change; Personal Icon
8 x Noise Marines - 275
- Champion, Power Fist; 6 x Sonic Blasters, Blastmaster, Personal Icon
Fast Attack
5 x Chaos Biker - 235
- Biker Champion, Power Fist; 2 x Meltagun, Icon of Chaos Glory
Heavy Support
Chaos Defiler - 150
- Close Combat Arm
Chaos Predator - 120
- Demonic Possession, Heavy Bolters
2 x Obliterator Cult - 150
2 x Obliterator Cult - 150
Total Points - 1499
Models - 29
I wasn't too sure about putting Slaanesh and Tzeentch into the same army, but with the way the Codex is set up it seems to work for a Black Legion army. I also wanted to try out both the Noise Marines and Thousand Sons and then maybe make a choice between the two. I went with the Choas Sorcerer out of fluff, thinking this is a unit put together by Abaddon to try and locate artifacts and ancient technologies. Although, I'm thinking a Demon Prince may be a better choice.
I went with the Chaos Bikers because I liked the look of their models. I'd like to mod the Champions's bike and make it into a chopper. I also thought giving them the meltaguns would allow them to swoop in fast and hit any armor of the enemy. I've been told that it's a good theory but doesn't always work out.
As for the Obliterators, I thought I would try deep striking them in, which is why the two infantry units have a personal icon. As for the rest, I just liked the look of the models. Anyway, I went ahead and put the list up on a few message boards to get some feedback.
http://www.heresy-online.net/forums/showthread.php?t=5582
http://www.bolterandchainsword.com/index.php?showtopic=129486
http://warseer.com/forums/showthread.php?t=127023
After reading the feedback, I decided to make a few changes. Here are the results of that.
Army #2
HQ
Chaos Sorcerer - 125
- Mark of Slaanesh, Lash of Submission
Elite
5 x Chaos Terminators - 170
- 2 x Power Fist
Troops
9 x Thousand Sons - 269
- Aspiring Sorcerer, Bolt of Change
8 x Noise Marines - 230
- 6 x Sonic Blasters, Blastmaster
10 x Chaos Space Marines - 220
- Meltagun, Missile Launcher, Chaos Rhino, Extra Armor
Fast Attack
5 x Chaos Biker - 235
- Biker Champion, Power Fist; 2 x Meltagun, Icon of Chaos Glory
Heavy Support
Chaos Defiler - 150
- Close Combat Arm
Chaos Predator - 100
- Heavy Bolters
Total Points - 1499
Models - 40
Playing A Game
I went to my FLGS on Sunday and met up with The Hoder to play my first full game. He was playing Orks and I used his Chaos models to put together Army #2 with a few proxies. Seeing as this was my first game, it went kind of slow and I thank Hoder for his patience. I was asking a lot of questions, we only made it through 1.5 turns and that alone took almost 3.5 hours.
I learned a lot of things though. For one, rolling double 1's when using a Psychic power is not a good thing. My Aspiring Sorcerer bit the dust trying to use Bolt of Change at the beginning of the second turn. During the first turn I lost my Chaos Sorcerer to an instant kill. I don't remember exactly what it was, but it was a nice big blast that took out a couple of Noise Marines as well. As for the Bikers, I'm still not sure about them. I had to hide them behind terrain the whole time, because they are fragile. Maybe next time.
Overall, it was a lot of fun. I'll probably make a few changes, possibly drop the Bikers for Raptors, but I'd like to get a full game in with the Bikers before I decide. I think I will definitely trade out the Chaos Sorcerer for a Demon Prince, as well as drop the Thousand Sons in favor of another Noise Marine squad. I'm working on another idea now, more of a mobile force, with the infantry all having a Rhino.
I'll see ya next week. I'm really excited, another budget blog coming up and I'll get my first models and start working on them. I can't wait.
Budget: Basic Modeling Tools
Posted On Tuesday, February 5, 2008 at at 2:58 PM by KoshWith last Friday being pay day, it's time to buy some more stuff. Everyone likes more stuff. Now that we have our space set up and our army picked out, we need to start acquiring the tools we need to put our models together. We also need to start thinking about our army list. For this, we'll be getting some basic modeling tools as well as the army codex. That would be plastic glue, plastic clippers, a hobby knife, a file set, and the Chaos Space Marine Codex.
Plastic Glue
This stuff is also known as Polystyrene Cement it's used for joining polystyrene (plastic) pieces together. It actually melts the plastic and allows the two parts to fuse together. There are many different brands of this glue out there, including a Games Workshop brand although it's a tad expensive. The one I went with was Testor Model Master Liquid Cement. This glue comes in a black bottle and has a nice metal precision tip. I've used this stuff before and found it worked very well. The metal tip really lets you hit tight spots and if it becomes clogged you can just heat the tip up with a lighter real quick to unclog it. I was able to find a bottle at a local hobby store for about $5. It's almost as expensive as the GW brand, but well worth it for the metal tip I think.
Plastic Clippers
You can get these almost anywhere, pretty cheap too. I checked out Wal-Mart and Hobby Lobby, but couldn't find a pair I really liked. I ended up getting the Games Workshop pair for $16. You need a pair that have a flat back to them for cutting off your pieces from the sprue. I would have liked to find a cheaper pair, but I think I was being a little picky. In the end I think it's worth it as you'll use these a lot.
Hobby Knife
Again, you can find these just about anywhere. I picked up a nice one at Hobby Lobby for $5. It's made by Excel and has a soft rubber grip similar to the Games Workshop knife. You'll be using this thing to cut small pieces off sprues and cleaning up flash and mold lines. Be careful, this knife is very sharp. Be sure to cut away from yourself.
File Set
These are a little harder to find. Games Workshop makes a three file set for $12. I was able to find an Excel 6 file set at Hobby Lobby for $12. You want them to have a very fine pattern as not to leave any rough edges. You'll use them mostly for filing down mold lines and doing conversions. The set I got had files so small you could store them inside the handle. Yet they are plenty big enough to get the job done.
Chaos Space Marines Codex
I picked up the codex at my FLGS for $24, remember all these prices are after tax. I'm about half way through the codex so far. Come see me next week, I should have an army list ready and will start talking about the first models that I'm going to purchase.
I had a few extra dollars left so I picked up something else for my work area. It's a nice little Carousel Organizer for holding brushes, files, glue, just about everything. It was only $6 at Hobby Lobby, making this budget's grand total $68.
WIP: Choosing An Army Part 2
Posted On Friday, February 1, 2008 at at 7:43 PM by KoshWhat did I choose?
When I first started doing my research, I only wanted to concern myself with what the models looked like. If I thought they were cool looking and had a nice paint scheme then that would be good enough for me. I started looking at all the different army types over at Games Workshop's website and the two that stood out were Space Marines and Witch Hunters. I was really gravitating towards the Witch Hunters.
The more research I did, the more I realized I'm going to eventually have to play with whatever army I chose. So, I started looking for game related things concerning Witch Hunters. I found this post over on Warseer. It talks about rating the armies in regards of how difficult they are to play for a new person starting the game. It seems that most people rated Space Marines, Necrons, Choas Space Marines, and Orks somewhere in their top 5 of easiest to play for beginners. Witch Hunters were always near the bottom. I decided not to go with Witch Hunters because of that and instead go with something in the top 5 from that post.
I started looking at Space Marines next. They were great looking models, but seemed a little generic. They weren't really grabbing me as they were before. So, I started looking at Chaos Space Marines. Now that was more like it. They didn't have a generic look, lots of spikes and other strange things. Also, the possibility of using demons. Seemed like a lot of diversity with CSM, I liked it. To be fair though, I took a look at the Orks. I wasn't so sure about Orks in Space, seemed kind of strange to me. I guess I'm just used to Orks only being in fantasy settings. The more I looked at them though, the more they grew on me. I was back to two, but I was leaning heavily on CSM.
What, more choices?
After deciding to go with CSM, it looked as though I needed to pick a specific Legion. I looked through all the legions of the CSM and tried to decide based on the paint scheme and their role in the game. I liked the look of the World Eaters and Black Legion the most. After reading some of the game mechanics I decided I liked Black Legion the best. The only problem I had was that the paint scheme seemed really basic. My friend Hoder pointed out to me though, that you don't have to go with straight black as you can see here of Matt Birdoff's BL army. I'm going to try to incorporate some deep purple or dark blue into mine when I paint them.
I did find out later on though, that you could mix different legion units in one army with the new Codex. That's a relief, as I think I'd tire of painting black all the time. Speaking of the codex, I'll be picking that up on the next budget, as well as some basic modeling tools. See ya then.
WIP: Choosing An Army
Posted On Monday, January 28, 2008 at at 4:02 PM by KoshThere are many reasons why people choose to play a specific army in the 40k universe. Some just like the look of that army's particular models or paint scheme. Others like the fluff of their chosen army. Having the most advantage in a game of 40k is still another reason for some and there is nothing wrong with that line of thinking. Whatever your reason, you still have to choose and the best thing to do first, is a little research.
Research
These days the best way to research just about anything is on the internet. There are plenty of websites that pop up if you do a Google search of Warhammer 40k. The first one you should check out, of course, is Games Workshop. They do make the game, you know. ;)
Over on the 40k page of GW, you can select any of the armies available from the top bar by selecting that armies icon. From there you can go to many pages devoted to painting, modeling, the history, gaming, and many more subjects on that particular army. You can also get even further in on some of the armies if they have specific clans, legions, or chapters. While you're there go to their online store and check out the prices of any army your interested in starting.
If you're really into the fluff of 40k one of the best places I've found is Wikipedia. For instance, if you search Wikipedia for Chaos Space Marines, it will bring up a page that tells you the history as well as the difference between CSM and regular Space Marines. From that page, via links, you can also go to each CSM Legion page and Chaos Gods page to read more fluff about them. You do have to take what you read on Wiki with a grain of salt though. It's an open encyclopedia, meaning just about anyone can make entries, but it's usually pretty good.
Also on the internet, there are plenty of forums, blogs (just like this one), and fan sites. One forum in particular that stands out is Warseer. Warseer is huge with over 33,000 members and has subjects on just about anything to do with the hobby. Don't be afraid to go on there and ask questions. The worst problem you may have is finding your post later on, as the amount of posts per day over there tend to make them scroll pretty fast. Another good site is Mini Wargaming, it seems to be a relatively new site. It has quite a few how to videos, a forum, and a store. It's really a great site and I hope they do well and grow. There are also a ton of blogs out there, all the blog links to the left there <--- are highly recommended. Last but not least, don't forget about your FLGS - favorite local game store. More than likely these are the people you're going to be playing the game with, you might as well get to know them. :P Don't be afraid to introduce yourself and ask questions, everyone was a noob at one time. You'll find 99% of them are normal friendly guys and gals that are willing to help you out. My FLSG is Grand Adventures in Murfreesboro, TN. They also have a webpage and a forum for talking about gaming while not at the store. I've recently been talking with The Hoder over there and he plays an army that I'm interested in playing. Hoder is going to let me play a game or two with his army to see how I like it.
What am I choosing?
I haven't decided yet. I'm on the fence between two armies. I'll be back and let you know after I check out Hoder's army this Thursday.
Budget: Setting Up A Painting Space
Posted On Monday, January 21, 2008 at at 10:20 AM by Kosh
Why a Specific Space
I'm going to set up a specific place to do my modeling and painting. I don't know about you, but I like to have a designated space to do specific things. You could always just paint on your dining table, but that could cause a lot of problems with the rest of your family. There will be times when you'll need to leave your current project sitting, either to let it dry or whatever. Leaving things sitting on the dining table doesn't go over well in my household. There are also times when you'll be struck with the mood to just sit down and paint. Having a specific place set up and ready will alleviate wasting this mood with dragging everything out and setting it all up. The space will just be ready and waiting for whenever you are.
The Basics
The three basic things to set up a painting and modeling space are: a place to work, a place to sit, and lighting. First, you're going to need a table for a place to work. You want something big enough to work on and keep your tools and painting equipment. Next, you'll need a place to sit your bottom, no one wants to stand up and work. I'd suggest a moderately comfortable chair, nothing too luxurious, you'll be working after all and you don't want to fall asleep. I'm looking for something with a straight back that doesn't recline. Last, you'll need to get a decent swivel lamp for when you want to work at night.
You want to set up the table near a window. This will give you natural light during the daytime and is very important. Artificial light gives off a yellow tinge which will cause you to see colors in a different way. Just as important, is getting a 'natural light' light bulb for your lamp. If your painting during the day in daylight and at night with an ordinary light bulb you'll be viewing your work in different conditions. Having a 'natural light' bulb will keep you consistent.
Budget
After getting my $100 for this two week pay period I set out looking for these items. By the way, I'll be rounding all prices to the nearest dollar after taxes. I picked up a 4ft x 2ft folding table for $41 at the local Office Depot. This will give me plenty of space for my tools, paint, and still leave plenty of space for the actual work of modeling and painting. Next, I picked up a sled based stacking chair. I got the chair at Officemax for $38, it was actually the Officemax brand, similar to this chair but about half the price. Last, I picked up a cheap lamp at Hobby Lobby for $12 and a 'natural light' light bulb for it at Home Depot. It was a nice halogen bulb that will last a good 2 years for $4.
That's a grand total of $95, so we used up most of the budget this time. That won't always be the case, believe me. There will be no eating lunch out this pay period, but at least I can buy 5 cups of cheap coffee the first week. Oh well, I'll live.
Warhammer 40k on a Budget
Posted On Tuesday, January 15, 2008 at at 7:13 AM by Kosh
Introduction
Hi, I'm Kosh and welcome to my little korner of the world. This blog is about starting and getting into the miniature strategy tabletop game, Warhammer 40k. I'm going to be starting from scratch, while on a budget. I know almost nothing about the Warhammer 40k back-story, building and painting miniatures, or playing the game itself. This is going to be a great journey for you, the reader of this blog, and me.
Like I said, I know very little about Warhammer 40k. I have painted a few minis about 10 years ago. I used to play Dungeons & Dragons and a friend of mine had some unpainted minis. I offered to paint a few for him, even though I knew absolutely nothing about painting them. Needless to say, they came out terrible, although I had a lot of fun in the process. I'm going to try to learn as much as possible about painting minis, as well as all the other aspects of this hobby, and I plan on recording my adventures here in this blog. I'm hoping to go from something like this:
To something like Doug Jones' Gold medal Golden Demon award winner:
I know, I know, I have high ambitions. It's going to take some patience, time, and talent to paint something that great. I'm hoping to find that I possess all three of those traits.
Being that this is going to be on a budget, it's going to take some time to work into certain things. My plan is to start out with buying the necessary supplies for modeling and painting. From there, I'll move onto the actual modeling and painting. Eventually, I'll get into the gaming aspect of the hobby. It may be as long as 6-8 months before I get into the gaming portion, so please have some patience with me.
The Budget
Let's talk about the budget. I get paid on a bi-weekly basis, and like most families, my family and I are on a tight budget. I get $100 every two weeks as "blow" money, or an "allowance" if you will. That's money I can spend on whatever I like, disposable income. That doesn't mean all $100 will go towards Warhammer 40k every pay period. I also use this money to buy coffee, lunch out once in a while, and other boring and mundane things. Also, I'm an avid video game player, once in a while I'll need to drop $60 on the latest "must play" video game. This is going to leave the budget at anywhere from $40-$100 every two weeks. I think that will be plenty as long as I have some patience.
This Friday (Jan 18th) is payday. I'll see you next week, when I delve into, Space: The Final Frontier - Creating a Place to Paint.


