Fun With Magnets
Posted On Saturday, March 1, 2008 at at 6:08 PM by Kosh
Why Magnetize?
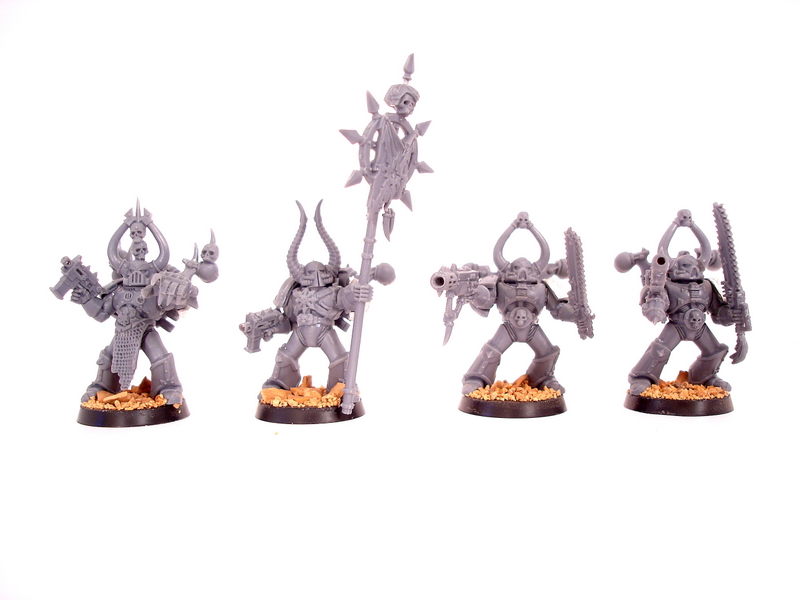
In the long run magnetizing your models could save you money and a lot of trouble. For instance, with a 10 man Chaos Marine Squad you can change the options on four of your marines. You can have an Icon Bearer, an Aspiring Champion, and up to two marines can have different weapons. My squad currently has an Aspiring Champion with a power fist, an Icon Bearer with the Icon of Chaos Glory, a marine with a Flamer, and a marine with a Meltagun. Let's say after playtesting with this squad I want to change the Icon to a Slaanesh Icon and change the champion's power fist to a power weapon. If I had glued them on this would be difficult, yes possible, but with magnets very simple.
How to Magnetize?
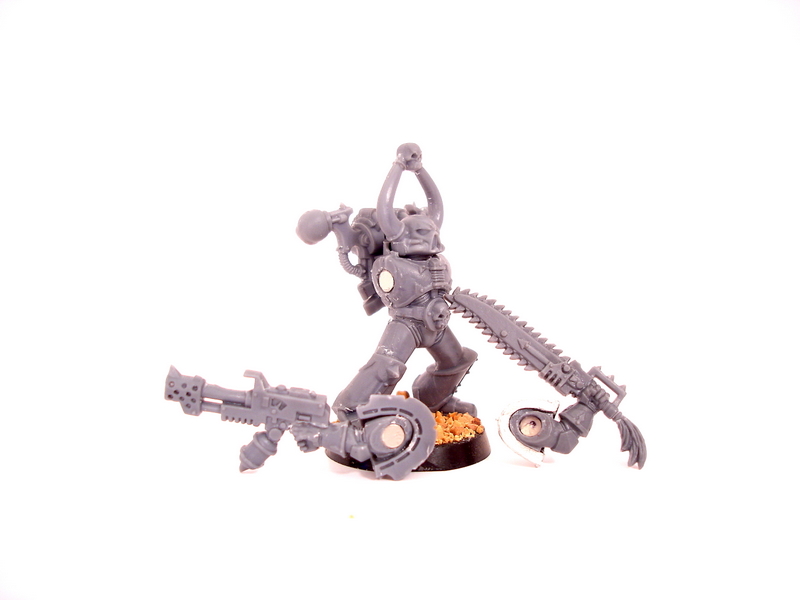
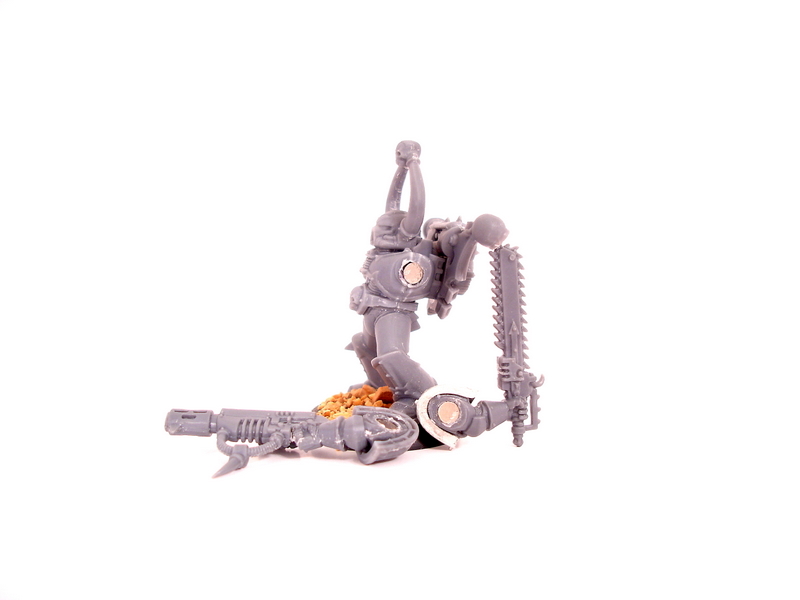
First of all, check out this tutorial by Hyun over at Wee Toy Soldiers. Hyun is the man, I've learned so much from his blog in such a short time. This does take some special equipment such as a dremel. The type Hyun uses, a MiniMite are very inexpensive. I use a Dremel Stylus myself that I bought a while back, they run about $60. Of course, you'll also need magnets. I bought my magnets from Amazing Magnets. You can get 100 1/16" and 100 1/8" for $12.50 + shipping, that's a lot of magnets that should last a while.
A few things to remember. Mark the poles on your magnets. You don't want to try and put the wrong poles together after you've already super glued the magnets. I used a permanent marker to mark two magnets that were stuck together. This tells you that the marked side goes down into the hole you drilled. Another thing, don't magnetize every available optional weapon right away. Just do whatever you need for your army right now. If you decide to go back and change something, say a Flamer to a Plasma Gun, magnetize the plasma gun then. This way, you know which model you're going to put it on and you can put a magnet on the existing shoulder socket magnet to get your poles correct. One last thing, don't worry if you drill in too far (just don't drill all the way through) and your magnet isn't flush. You can stick some green stuff down in there or just go with it if it's not too bad, the magnet should still be strong enough to hold. It takes a few tries to get the depth correct.
That's about it. Don't get discouraged, a couple of people told me not to worry about magnetizing because I'm new to the hobby and may not be ready for it yet. You can read about doing things and watch tutorials until your blue in the face, but you're not going to really learn anything until you try to do it yourself. Remember, "What we have to learn to do, we learn by doing." - Aristotle.

WIP: Chaos Marines, Assemble!
Posted On Tuesday, February 26, 2008 at at 2:28 PM by KoshI've finally gotten started on some modeling. I started assembling the box of Chaos Space Marines I purchased last week. I've decided to only put six together so far, as I have plans to magnetize the other four. Hopefully, I will get started on that magnetization project later this week.
Putting together Space Marines is really pretty simple. There's basically eight steps to doing it and Games Workshop has an instruction page on it that you can find here. The eight steps are:
Step 1: Glue the legs to the base.
Step 2: Glue the torso halves together.
Step 3: Glue the torso to the legs.
Step 4: Glue the weapons to the arms.
Step 5: Glues the arms to the torso.
Step 6: Glue the head to the torso.
Step 7: Glue the shoulder pads to the arms.
Step 8: Glue the backpack to the torso.
That's all there is to it. I made a tutorial video of me putting mine together. It's not much, I just wanted to get my feet wet with Windows Movie Maker more than anything.
There are a few things to remember. Try to clean up any flash or mold lines before gluing the pieces together. It's okay if you miss a few, it's just easier to do before the model is completely put together. You can see that I missed a few on the arms and weapons.


That's it for this week. I'll see you next week with a new budget article. Hopefully sooner if my magnetization project comes together.
Budget: Flock, Primer, and Chaos
Posted On Tuesday, February 19, 2008 at at 3:06 PM by KoshIt's budget time again. This pay period I'll be buying the last few items needed to get our models primed and ready for painting. Also, I'll share with you the first set of models I bought. On a side note, if you're looking for a very, very good tutorial on taking pictures of your models check out this article written by Hyun over at Wee Toy Soldiers. Let's get started.
Modeling Sand or Flock
Modeling sand or flock is used for basing your models. It's glued on to the base using PVA glue and can be painted with the rest of the model. Some people like to base their models before they prime them, while others like to base their models as the last thing they do. I think I'd prefer to base them before priming and paint the base material as I paint the model.
GW sells this stuff for $8 a tub. I bought sand made by Gale Force Nine. They have three types fine, medium, and rocky. I picked up a container of each and mixed them all together, it was $13 for all three containers. There are plenty of cheaper ways to get basing material. If you want sand you could go out and collect it on the side of the road or the beach if you live near one. As for flock, you can make that out of sawdust and paint. Here's a written tutorial and a video on how to make flock, both are from Miniwargaming.com.
PVA Glue
PVA Glue is used to make your sand or flock stick to your base. PVA glue is nothing but ordinary white or yellow glue. Elmer's Glue, Wal-Mart brand, wood glue, it's all the same. Whatever you do, don't pay $7 for the GW PVA glue. I picked up a big bottle of Elmer's Glue All for $2. You're also going to need a cheap paint brush, I'd say a size 3 or 4, to apply the glue to your base. I got a cheap brush for $2 at a hobby store.
Spray Primer
Primer provides a base coat so that your paint adheres to your model. Without a primer your paint will rub off the plastic when it's handled. GW sells both white and black primer for $10 per can. From what I've read, beginners should use black primer to start out with, while most advanced painters tend to use white primer. If you'd like to know the reasons why, since I have no experience with either, check out this article by Starks. I bought the GW brand Choas Black for $11. Honestly I wanted a gray primer but, was unable to find one. If you know of a good brand of gray primer let me know.
Buying Models
I haven't completely decided on an army list yet. However, every list I seem to come up with usually has 10 Chaos Space Marines in it, therefore I bought the Chaos Space Marine box set for $39. Yes, sales tax in my state is ridiculous, it's 9.75%. Anyway, I'm pretty excited about getting started on them and hope to do so sometime this week. Check out the sprue.


Budget
The total amount spent this time was $67. I'm going to save $20 from this budget and bring it forward to the next budget. I'm anticipating that I'll need it to buy paint, brushes, and possibly some shelves to store the paint. But hey, I'll be back before then. The next couple of articles will be works in progress on modeling the Chaos Space Marines. See you then.
Budget: Basic Modeling Tools
Posted On Tuesday, February 5, 2008 at at 2:58 PM by KoshWith last Friday being pay day, it's time to buy some more stuff. Everyone likes more stuff. Now that we have our space set up and our army picked out, we need to start acquiring the tools we need to put our models together. We also need to start thinking about our army list. For this, we'll be getting some basic modeling tools as well as the army codex. That would be plastic glue, plastic clippers, a hobby knife, a file set, and the Chaos Space Marine Codex.
Plastic Glue
This stuff is also known as Polystyrene Cement it's used for joining polystyrene (plastic) pieces together. It actually melts the plastic and allows the two parts to fuse together. There are many different brands of this glue out there, including a Games Workshop brand although it's a tad expensive. The one I went with was Testor Model Master Liquid Cement. This glue comes in a black bottle and has a nice metal precision tip. I've used this stuff before and found it worked very well. The metal tip really lets you hit tight spots and if it becomes clogged you can just heat the tip up with a lighter real quick to unclog it. I was able to find a bottle at a local hobby store for about $5. It's almost as expensive as the GW brand, but well worth it for the metal tip I think.
Plastic Clippers
You can get these almost anywhere, pretty cheap too. I checked out Wal-Mart and Hobby Lobby, but couldn't find a pair I really liked. I ended up getting the Games Workshop pair for $16. You need a pair that have a flat back to them for cutting off your pieces from the sprue. I would have liked to find a cheaper pair, but I think I was being a little picky. In the end I think it's worth it as you'll use these a lot.
Hobby Knife
Again, you can find these just about anywhere. I picked up a nice one at Hobby Lobby for $5. It's made by Excel and has a soft rubber grip similar to the Games Workshop knife. You'll be using this thing to cut small pieces off sprues and cleaning up flash and mold lines. Be careful, this knife is very sharp. Be sure to cut away from yourself.
File Set
These are a little harder to find. Games Workshop makes a three file set for $12. I was able to find an Excel 6 file set at Hobby Lobby for $12. You want them to have a very fine pattern as not to leave any rough edges. You'll use them mostly for filing down mold lines and doing conversions. The set I got had files so small you could store them inside the handle. Yet they are plenty big enough to get the job done.
Chaos Space Marines Codex
I picked up the codex at my FLGS for $24, remember all these prices are after tax. I'm about half way through the codex so far. Come see me next week, I should have an army list ready and will start talking about the first models that I'm going to purchase.
I had a few extra dollars left so I picked up something else for my work area. It's a nice little Carousel Organizer for holding brushes, files, glue, just about everything. It was only $6 at Hobby Lobby, making this budget's grand total $68.
Budget: Setting Up A Painting Space
Posted On Monday, January 21, 2008 at at 10:20 AM by Kosh
Why a Specific Space
I'm going to set up a specific place to do my modeling and painting. I don't know about you, but I like to have a designated space to do specific things. You could always just paint on your dining table, but that could cause a lot of problems with the rest of your family. There will be times when you'll need to leave your current project sitting, either to let it dry or whatever. Leaving things sitting on the dining table doesn't go over well in my household. There are also times when you'll be struck with the mood to just sit down and paint. Having a specific place set up and ready will alleviate wasting this mood with dragging everything out and setting it all up. The space will just be ready and waiting for whenever you are.
The Basics
The three basic things to set up a painting and modeling space are: a place to work, a place to sit, and lighting. First, you're going to need a table for a place to work. You want something big enough to work on and keep your tools and painting equipment. Next, you'll need a place to sit your bottom, no one wants to stand up and work. I'd suggest a moderately comfortable chair, nothing too luxurious, you'll be working after all and you don't want to fall asleep. I'm looking for something with a straight back that doesn't recline. Last, you'll need to get a decent swivel lamp for when you want to work at night.
You want to set up the table near a window. This will give you natural light during the daytime and is very important. Artificial light gives off a yellow tinge which will cause you to see colors in a different way. Just as important, is getting a 'natural light' light bulb for your lamp. If your painting during the day in daylight and at night with an ordinary light bulb you'll be viewing your work in different conditions. Having a 'natural light' bulb will keep you consistent.
Budget
After getting my $100 for this two week pay period I set out looking for these items. By the way, I'll be rounding all prices to the nearest dollar after taxes. I picked up a 4ft x 2ft folding table for $41 at the local Office Depot. This will give me plenty of space for my tools, paint, and still leave plenty of space for the actual work of modeling and painting. Next, I picked up a sled based stacking chair. I got the chair at Officemax for $38, it was actually the Officemax brand, similar to this chair but about half the price. Last, I picked up a cheap lamp at Hobby Lobby for $12 and a 'natural light' light bulb for it at Home Depot. It was a nice halogen bulb that will last a good 2 years for $4.
That's a grand total of $95, so we used up most of the budget this time. That won't always be the case, believe me. There will be no eating lunch out this pay period, but at least I can buy 5 cups of cheap coffee the first week. Oh well, I'll live.


